> For the complete documentation index, see [llms.txt](https://reference-guide.gitbook.io/crm-back-office-user-guide-full/llms.txt). Markdown versions of documentation pages are available by appending `.md` to page URLs; this page is available as [Markdown](https://reference-guide.gitbook.io/crm-back-office-user-guide-full/17.-settings/client-portal-brand-settings/domain-settings/create-new-domain.md).

# Create New Domain

To create a new domain, follow the steps below:&#x20;

{% tabs %}
{% tab title="Step 1" %}

1. Click "Create" to start the domain creation process.<br>

   <figure><img src="https://1412218885-files.gitbook.io/~/files/v0/b/gitbook-x-prod.appspot.com/o/spaces%2FZjte3ihj30mTFvqCasyX%2Fuploads%2FyjzhDTIee4S2a3OJkp10%2Fimage.png?alt=media&amp;token=5e41f510-83e8-4fb3-aa13-2a17aa8d7619" alt=""><figcaption></figcaption></figure>
2. Enter the desired new domain name, excluding "https\://".
3. Resolve the server to Cloudflare name server by following the provided instructions in the link provided. This ensures proper linking of your domain to the Cloudflare DNS service.

   \
   ![](https://1412218885-files.gitbook.io/~/files/v0/b/gitbook-x-prod.appspot.com/o/spaces%2FZjte3ihj30mTFvqCasyX%2Fuploads%2FdBNCKKbYWWCGLw6XzohC%2Fimage.png?alt=media\&token=c2493862-4c3a-4024-926a-d89b5d073360)
   {% endtab %}

{% tab title="Step 2" %}

1. Access your Cloudflare DNS server and acknowledge the CNAME records.&#x20;
2. You can find the CNAME record details by clicking "Check Details" in the CRM.<br>

   <figure><img src="https://1412218885-files.gitbook.io/~/files/v0/b/gitbook-x-prod.appspot.com/o/spaces%2FZjte3ihj30mTFvqCasyX%2Fuploads%2Fdligk5LWsT3immoMaMoy%2Fimage.png?alt=media&amp;token=e84bd387-14f6-477b-a5a6-cf57158b018a" alt=""><figcaption></figcaption></figure>
3. The CNAME record details will be displayed accordingly.&#x20;

   <figure><img src="https://1412218885-files.gitbook.io/~/files/v0/b/gitbook-x-prod.appspot.com/o/spaces%2FZjte3ihj30mTFvqCasyX%2Fuploads%2FPCQfkfp2ZZyOxMT4lyCY%2Fimage.png?alt=media&amp;token=679717b1-daf8-4f75-a674-5efe6fd4d1f3" alt=""><figcaption></figcaption></figure>

{% endtab %}

{% tab title="Step 3" %}

1. Once the records have been resolved, click "Verify" to initiate the verification process. <br>

   <figure><img src="https://1412218885-files.gitbook.io/~/files/v0/b/gitbook-x-prod.appspot.com/o/spaces%2FZjte3ihj30mTFvqCasyX%2Fuploads%2FqdnFfIvlSPFKJ0ddhSGv%2Fimage.png?alt=media&amp;token=22e9ed4c-6ba5-43b2-a704-2c2e1ce62822" alt=""><figcaption></figcaption></figure>
2. Upon successful verification, your new domain for the CRM Client Portal will be ready to use.
   {% endtab %}

{% tab title="Step 4" %}
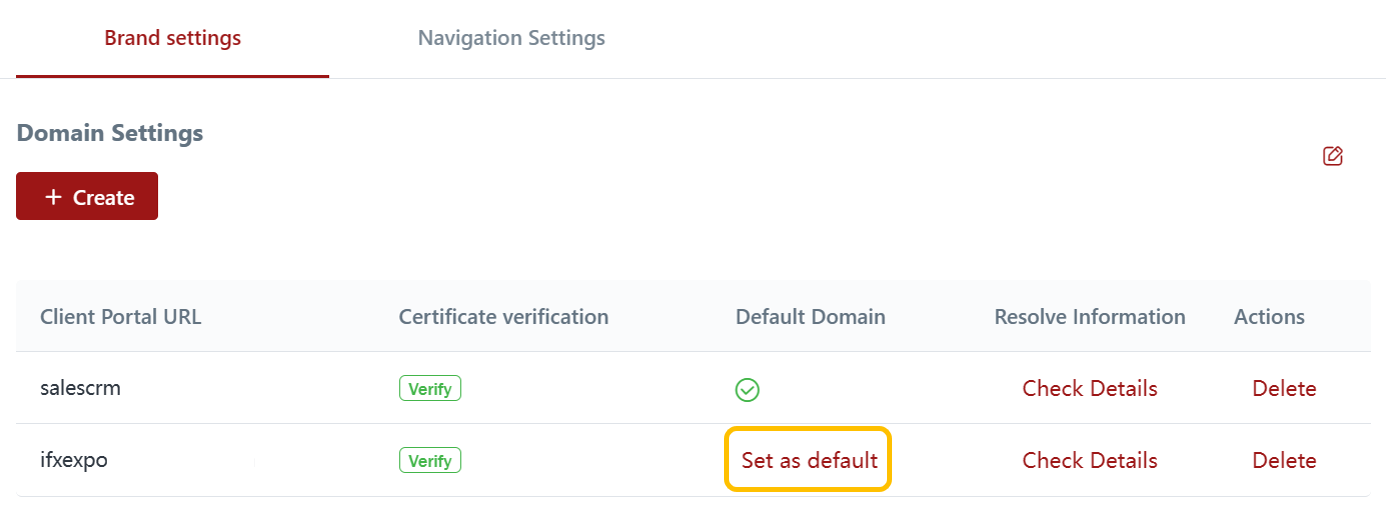
You can set a default domain for your CRM Client Portal by clicking "Set as Default". <br>

<figure><img src="https://1412218885-files.gitbook.io/~/files/v0/b/gitbook-x-prod.appspot.com/o/spaces%2FZjte3ihj30mTFvqCasyX%2Fuploads%2FlUGejzwZOSfNbhKu9dey%2Fimage.png?alt=media&amp;token=3c9b446f-68a0-4e0b-81ca-0eea4e4414c1" alt=""><figcaption></figcaption></figure>
{% endtab %}
{% endtabs %}