# Webhooks

### <mark style="color:red;">1. Webhook API Documentation</mark>

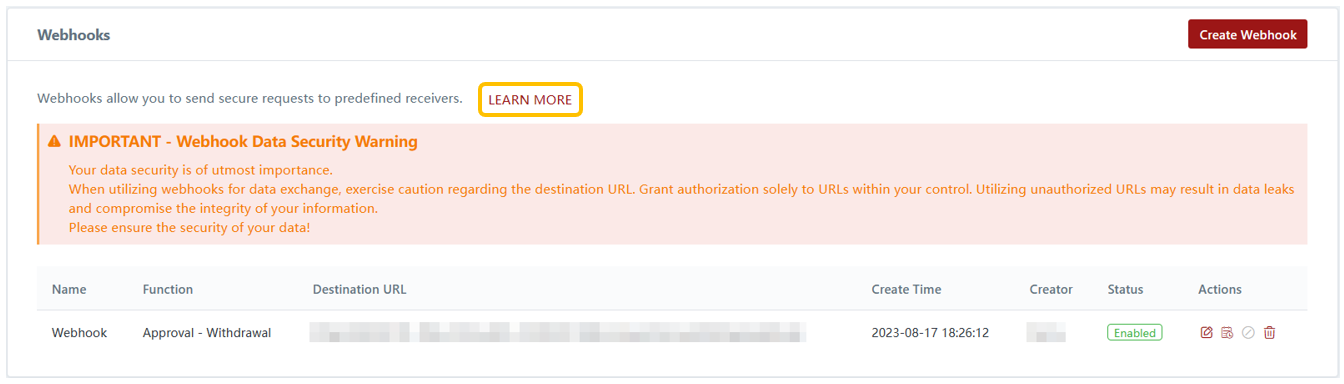
To initiate your usage of webhooks, simply click on "Learn More" to access the API documentation dedicated to webhooks.

<figure><img src="https://1412218885-files.gitbook.io/~/files/v0/b/gitbook-x-prod.appspot.com/o/spaces%2FZjte3ihj30mTFvqCasyX%2Fuploads%2Fwe3gzKWAosWYISn2I12o%2Fimage.png?alt=media&#x26;token=c7069f0c-0802-49da-ab7e-be17f5e865b4" alt=""><figcaption></figcaption></figure>

Upon clicking, you'll be directed to a new tab containing the API documentation.<br>

<figure><img src="https://1412218885-files.gitbook.io/~/files/v0/b/gitbook-x-prod.appspot.com/o/spaces%2FZjte3ihj30mTFvqCasyX%2Fuploads%2FqDKkWe4ihjcpQ7bAtebD%2Fimage.png?alt=media&#x26;token=72744574-b1f9-446f-8d45-10b3e95d906e" alt=""><figcaption></figcaption></figure>

### <mark style="color:red;">2. Creating Webhooks</mark>

{% tabs %}
{% tab title="Step 1" %}
Click "Create Webhook".&#x20;

<figure><img src="https://1412218885-files.gitbook.io/~/files/v0/b/gitbook-x-prod.appspot.com/o/spaces%2FZjte3ihj30mTFvqCasyX%2Fuploads%2FCXuicivxYV4nUsjVoudA%2Fimage.png?alt=media&#x26;token=15b89c56-8cb2-4554-a37e-ee257faeeaa9" alt=""><figcaption></figcaption></figure>
{% endtab %}

{% tab title="Step 2" %}
Fill in the respective fields:&#x20;

1. Name - this refers to the name of the webhook.&#x20;
2. Destination URL - this is the URL where the information will be received.&#x20;
3. Select Function - currently, webhooks only support withdrawals, prop trading participation and prop trading live stage requests.&#x20;
4. Select Event - this determines when information is transmitted via the webhook to the destination URL.&#x20;
   * Approve Withdrawal - Node N
     1. N corresponds to the approver level.
     2. If you select both Node 1 and 2, it means that if the level 1 or 2 approver approves the withdrawal request, information will be sent through the webhook. This configuration should be aligned with your withdrawal process.&#x20;
   * Reject Withdrawal: Information will be sent to the destination URL when withdrawal requests are rejected.&#x20;
5. Secret Key

Click "Save" to successfully create the new webhook.&#x20;

<figure><img src="https://1412218885-files.gitbook.io/~/files/v0/b/gitbook-x-prod.appspot.com/o/spaces%2FZjte3ihj30mTFvqCasyX%2Fuploads%2F5bO90elB2eNDseTkLBPp%2Fimage.png?alt=media&#x26;token=70375f3b-ffc0-4b1f-a16c-19bef928a8e6" alt="" width="301"><figcaption></figcaption></figure>
{% endtab %}
{% endtabs %}

### <mark style="color:red;">3. Editing Webhooks</mark>

To edit a webhook, follow these steps:&#x20;

{% tabs %}
{% tab title="Step 1" %}
Locate the desired webhook and click the "Edit" icon.&#x20;

<figure><img src="https://1412218885-files.gitbook.io/~/files/v0/b/gitbook-x-prod.appspot.com/o/spaces%2FZjte3ihj30mTFvqCasyX%2Fuploads%2FydZNHHu3AkcUq8aRVrdh%2Fimage.png?alt=media&#x26;token=883ef330-0941-4ac5-bb2e-5a3308227089" alt=""><figcaption></figcaption></figure>
{% endtab %}

{% tab title="Step 2" %}

1. Make the necessary changes.&#x20;
2. Confirm your changes by clicking "Save".  <br>

   <figure><img src="https://1412218885-files.gitbook.io/~/files/v0/b/gitbook-x-prod.appspot.com/o/spaces%2FZjte3ihj30mTFvqCasyX%2Fuploads%2FAqYroziytMgDxgEs89U2%2Fimage.png?alt=media&#x26;token=45ab1dd3-7091-4ddd-8bbc-0fa466c9dff3" alt="" width="294"><figcaption></figcaption></figure>

{% endtab %}
{% endtabs %}

### <mark style="color:red;">4. View History</mark>

1. To access webhook logs, simply click on the "History" icon.<br>

   <figure><img src="https://1412218885-files.gitbook.io/~/files/v0/b/gitbook-x-prod.appspot.com/o/spaces%2FZjte3ihj30mTFvqCasyX%2Fuploads%2FfbRVMngyuLYkEUs1sgwL%2Fimage.png?alt=media&#x26;token=19ddc4ed-6fa9-4ebe-af69-13af8ad70638" alt=""><figcaption></figcaption></figure>
2. You will be able to view the details of each log. <br>

   <figure><img src="https://1412218885-files.gitbook.io/~/files/v0/b/gitbook-x-prod.appspot.com/o/spaces%2FZjte3ihj30mTFvqCasyX%2Fuploads%2FzYZm6g4llKh2UV8Ielw8%2Fimage.png?alt=media&#x26;token=4b9cd72c-d95b-4fae-a519-ca64f2e84182" alt=""><figcaption></figcaption></figure>
3. You can review the details of the webhook request by simply clicking on it.<br>

   <figure><img src="https://1412218885-files.gitbook.io/~/files/v0/b/gitbook-x-prod.appspot.com/o/spaces%2FZjte3ihj30mTFvqCasyX%2Fuploads%2F7lAbvudlu5rhFuq73Kdl%2Fimage.png?alt=media&#x26;token=f245a19a-1627-42f4-8bdb-9e6a88b10edd" alt=""><figcaption></figcaption></figure>
4. Should you wish to re-send a specific request, click on the "Resend" icon. <br>

   <figure><img src="https://1412218885-files.gitbook.io/~/files/v0/b/gitbook-x-prod.appspot.com/o/spaces%2FZjte3ihj30mTFvqCasyX%2Fuploads%2F2ZQzHgZeqJooc8ushP4P%2Fimage.png?alt=media&#x26;token=179b72df-8721-445a-bc80-ee781f86adf7" alt=""><figcaption></figcaption></figure>
5. A confirmation popup will appear before proceeding with the action.<br>

   <figure><img src="https://1412218885-files.gitbook.io/~/files/v0/b/gitbook-x-prod.appspot.com/o/spaces%2FZjte3ihj30mTFvqCasyX%2Fuploads%2FHZP7HJ5FOtP7yOfRDhq8%2Fimage.png?alt=media&#x26;token=9d644b1a-44d3-46aa-9eb1-de62ffcfbbfa" alt="" width="294"><figcaption></figcaption></figure>

### <mark style="color:red;">5. Disable Webhooks</mark>

To disable webhooks, follow these steps:&#x20;

{% tabs %}
{% tab title="Step 1" %}
Find the specific webhook you wish to disable and select the "Disable" icon.

<figure><img src="https://1412218885-files.gitbook.io/~/files/v0/b/gitbook-x-prod.appspot.com/o/spaces%2FZjte3ihj30mTFvqCasyX%2Fuploads%2FdD6LSgfgTZd8hpwhGvwD%2Fimage.png?alt=media&#x26;token=c27bdf9a-f432-499f-b39e-995e80d93536" alt=""><figcaption></figcaption></figure>
{% endtab %}

{% tab title="Step 2" %}

1. Once a webhook is disabled, it will cease to transmit messages to the designated destination URL.
2. To reactivate the webhook, simply click on the same icon.
   {% endtab %}
   {% endtabs %}

### <mark style="color:red;">6. Delete Webhooks</mark>

To delete a webhook, follow these steps:&#x20;

{% tabs %}
{% tab title="Step 1" %}
Find the desired webhook and click the "Delete" icon.

<figure><img src="https://1412218885-files.gitbook.io/~/files/v0/b/gitbook-x-prod.appspot.com/o/spaces%2FZjte3ihj30mTFvqCasyX%2Fuploads%2FQUZ2IukdyPONZCZQXd6i%2Fimage.png?alt=media&#x26;token=2adb5056-c2d9-44be-8ca3-f79f3a3373e8" alt=""><figcaption></figcaption></figure>
{% endtab %}

{% tab title="Step 2" %}

1. A popup confirmation message will appear for your verification.
2. Click "Confirm" to proceed with the deletion.<br>

   <figure><img src="https://1412218885-files.gitbook.io/~/files/v0/b/gitbook-x-prod.appspot.com/o/spaces%2FZjte3ihj30mTFvqCasyX%2Fuploads%2FQyC3suy8EIhzmyV9jQC1%2Fimage.png?alt=media&#x26;token=9e0179f2-dd26-45bf-b6df-3bec3c882e51" alt="" width="248"><figcaption></figcaption></figure>

{% endtab %}
{% endtabs %}

### <mark style="color:red;">7. Reviewing Withdrawal Requests</mark>

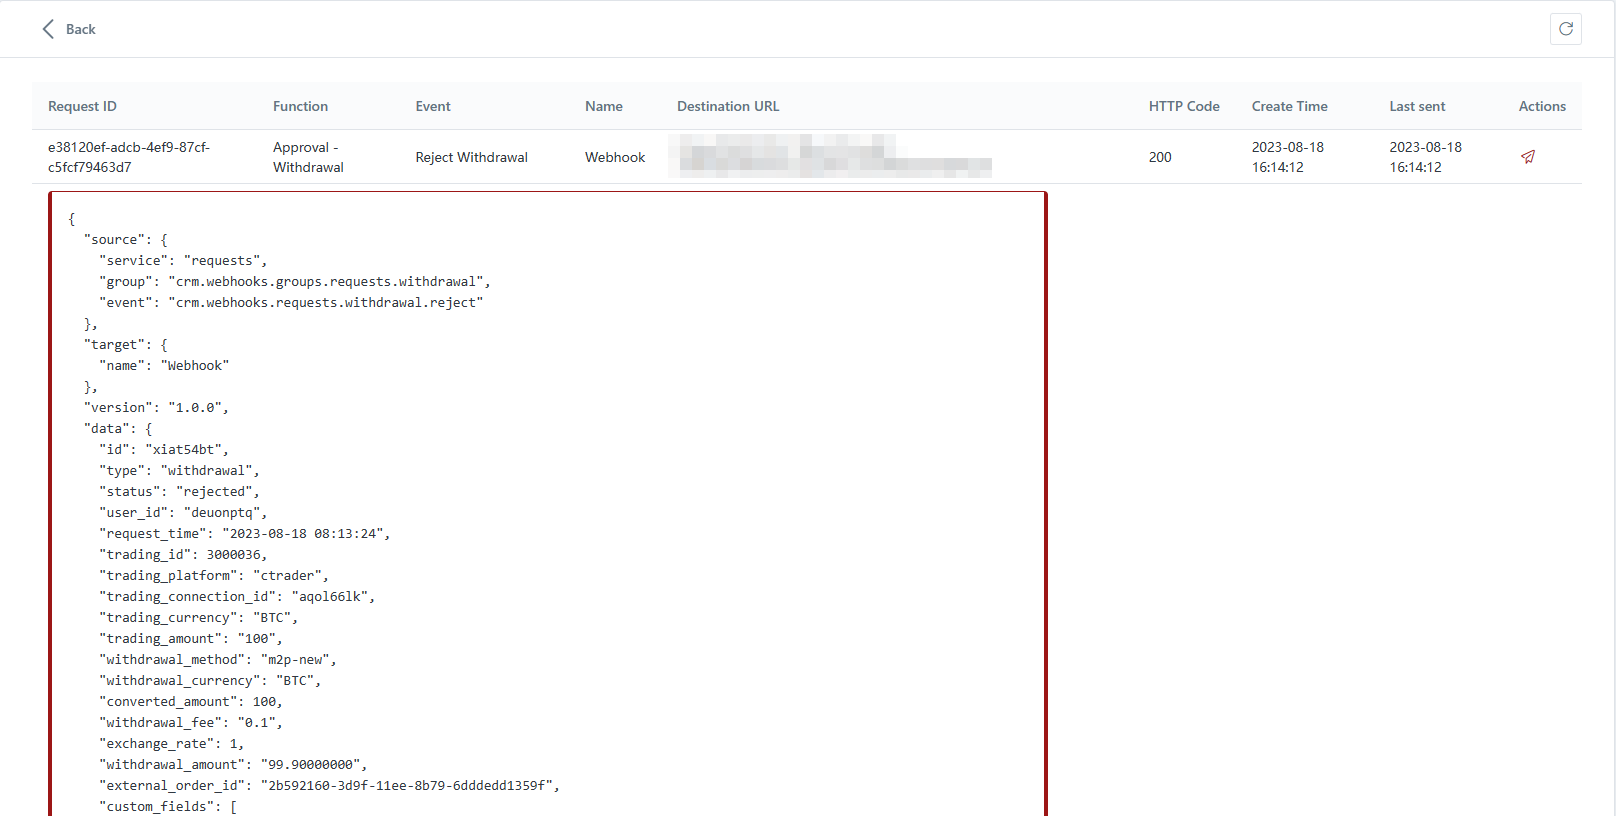
1. When clients submit a withdrawal request, and upon the occurrence of the first triggered event (as configured for the webhook), the data will be sent to the designated destination URL.
2. The transmitted information will encompass the data boxed up in yellow in the provided image.<br>

   <figure><img src="https://1412218885-files.gitbook.io/~/files/v0/b/gitbook-x-prod.appspot.com/o/spaces%2FZjte3ihj30mTFvqCasyX%2Fuploads%2FqpSizAACZFP4MFLMomU1%2Fimage.png?alt=media&#x26;token=06a743a2-c2d6-439d-97a9-e6dcd218b332" alt="" width="375"><figcaption></figcaption></figure>
3. After the withdrawal process is completed in the third-party system, you can proceed with the subsequent review steps for the submitted request.


---

# Agent Instructions: Querying This Documentation

If you need additional information that is not directly available in this page, you can query the documentation dynamically by asking a question.

Perform an HTTP GET request on the current page URL with the `ask` query parameter:

```
GET https://reference-guide.gitbook.io/crm-back-office-user-guide-full/17.-settings/back-office-portal-dev-space/webhooks.md?ask=<question>
```

The question should be specific, self-contained, and written in natural language.
The response will contain a direct answer to the question and relevant excerpts and sources from the documentation.

Use this mechanism when the answer is not explicitly present in the current page, you need clarification or additional context, or you want to retrieve related documentation sections.
