> For the complete documentation index, see [llms.txt](https://reference-guide.gitbook.io/crm-version-release-notes/llms.txt). Markdown versions of documentation pages are available by appending `.md` to page URLs; this page is available as [Markdown](https://reference-guide.gitbook.io/crm-version-release-notes/v7.44.0-2025-q2-quality-of-life-qol-update-part-3-daily-operational-efficiencies-in-focus.md).
# V7.44.0 - 2025 Q2 Quality of Life (QOL) Update Part 3: Daily Operational Efficiencies in Focus
*Greater control. Smoother workflows. Smarter tools.*
**Released Date - 20 May 2025**
This QOL update brings purposeful enhancements designed to improve your daily workflows. From expanded language support to smarter account management with safeguards against operational missteps, these upgrades deliver impact where it counts.
Whether you're integrating external tools, monitoring referral activity, or evaluating financial insights, you'll experience greater convenience—without added complexity.
### Key Function Highlights
1. [**New Dynamic Parameters for Custom Navigation Links**](#id-1-new-dynamic-parameters-for-custom-navigation-links)**:** Embed dynamic parameters—such as "name", "email", and "user\_id"—into external links on custom navigation pages. This enables client-specific data to pass automatically to third-party tools for personalized access.
2. [**Multi-Language Configuration for Client Groups**](#id-2-multi-language-configuration-for-client-groups)**:** Client Group names and descriptions are now configurable in multiple languages. Users will see these labels in their selected portal language, improving clarity across global teams.
3. [**Balance Checks Before Client Deletion**](#id-3-balance-checks-before-client-deletion)**:** To prevent the accidental removal of clients with active funds, the system will now check all linked trading accounts for remaining balances before deletion is allowed. This eliminates leftover balances and avoids complications in tracing account ownership.
4. [**Trading Account Group Change Restrictions**](#id-4-trading-account-group-change-restrictions)**:** Trading accounts with pending deposits or transfers can no longer be moved to groups with a different currency, helping prevent currency mismatches and transaction errors.
5. [**cTrader Account Deletion from CRM**](#id-5-ctrader-account-deletion-from-crm)**:** Delete cTrader accounts—individually or in bulk—directly from the CRM without accessing the cTrader platform. This simplifies account cleanup and admin workflows.
6. [**Email Notification Enhancements**](#id-6-email-notification-enhancements)
* [**Referral Info in Approval Emails**](#a-referral-info-in-approval-emails)**:** Admin notifications for approved requests now include referral details, making it easier to identify the referring IB and follow up when key client actions occur.
* [**Dedicated cTrader Welcome Emails**](#b-dedicated-ctrader-welcome-emails)**:** New cTrader accounts now trigger platform-specific emails, ensuring clients receive tailored onboarding details—instead of the generic template used for all trading platforms.
7. [**Report Enhancements**](#id-7-report-enhancements)
* [**Client Activity Insights in Transactions Report**](#a-client-activity-insights-in-transactions-report)**:** Two new fields—unique client counts and deposit/withdrawal totals in their original transaction currencies—provide deeper insight into client behaviour and funding preferences, supporting better payment channel decisions.
* [**Advanced Referral Filters in Client Portal**](#b-advanced-referral-filters-in-client-portal)**:** Advanced referral filtering—previously only available in the back office—is now accessible in the client portal. Referrers can easily filter by downlines, uplines, custom level range from 0 to 100, or use the referral tree for precise, targeted views.
### 1) **New Dynamic Parameters for Custom Navigation Links**
You can now embed dynamic parameters—such as "name", "email", and "user\_id"—into external links on custom navigation pages. This enables client-specific data to pass automatically to third-party tools for personalized access.
To do so, follow these steps:
{% stepper %}
{% step %}
#### Edit Navigation Page
1. Go to "Settings" > "Brand Settings" > "Navigation Settings".
2. Locate the custom navigation page you want to edit and click the "Edit" icon.
{% endstep %}
{% step %}
#### Embed Parameters into the Link
1. At the bottom, you'll see available parameters: name, email, and user\_id.
2. Click on any parameter to automatically embed it into your link.
3. You can include multiple parameters if needed.
4. Click "Confirm" to save your changes.
5. Once embedded, these parameters will be passed through when a client accesses the custom navigation page. This allows your linked page or portal to receive the client-specific information and tailor the experience or content accordingly.
{% endstep %}
{% endstepper %}
### 2) Multi-Language Configuration for Client Groups
Client Group names and descriptions are now configurable in multiple languages. Users will see these labels in their selected portal language, improving clarity across global teams.
To configure the Client Group names, follow these steps:
{% stepper %}
{% step %}
#### Edit Client Group
1. Navigate to "Settings" > "Client Group".
2. Locate the client group name you want to edit and click the "Edit" icon.
{% endstep %}
{% step %}
#### Configure Name & Description
1. Click the "Language" icon. \
\

2. Fill in the name or description in the respective languages.
3. Click "Save". \
\

4. Click "Confirm". \
\

{% endstep %}
{% step %}
#### Application
Once you’ve configured the client group name and description in each language, users will see the information displayed in their selected portal language.
{% endstep %}
{% endstepper %}
### 3) **Balance Checks Before Client Deletion**
To prevent the accidental removal of clients with active funds, the system will now check all linked trading accounts for remaining balances before deletion is allowed. This eliminates leftover balances and avoids complications in tracing account ownership.
If any trading accounts have remaining balances, the system will display the error message: **"Existing balance in trading accounts."**
To proceed, you must withdraw the remaining funds or unbind the trading accounts from the client.
### 4) Trading Account Group Change Restrictions
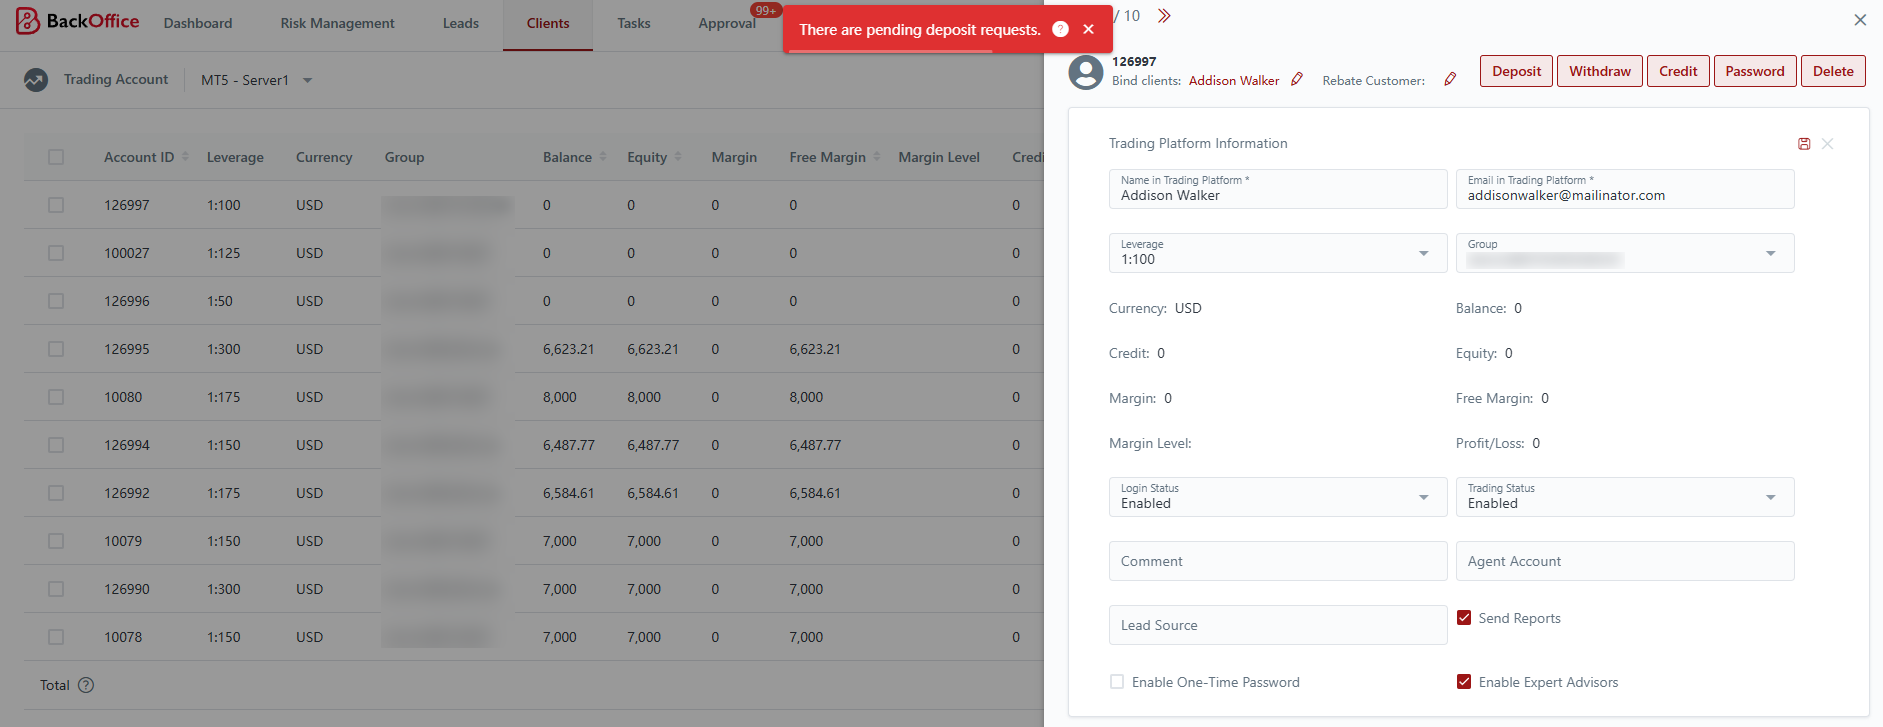
Trading accounts with pending deposits or transfers can no longer be moved to groups with a different currency, helping prevent currency mismatches and transaction errors.
If you attempt to change the trading account group to one with a different currency while there are pending deposit or transfer requests, an error message will be displayed. You must approve or reject the requests before proceeding with the group change.
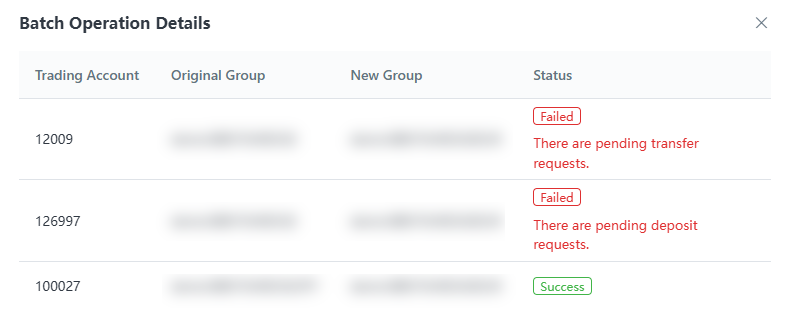
Similarly, if you perform a batch change of trading account groups, any accounts with pending deposit or transfer requests—where the target group has a different currency—will fail to update. You’ll need to approve or reject the pending requests before attempting the group change again.
### 5) cTrader Account Deletion from CRM
You can now delete cTrader accounts—individually or in bulk—directly from the CRM without accessing the cTrader platform. This simplifies account cleanup and admin workflows.
To delete cTrader accounts, follow these steps:
{% stepper %}
{% step %}
#### Navigate to Trading Accounts
1. Go to "Clients" > "Trading Accounts".
2. Select your cTrader Trading Platform in the dropdown menu.
{% endstep %}
{% step %}
#### Delete Individual Trading Account
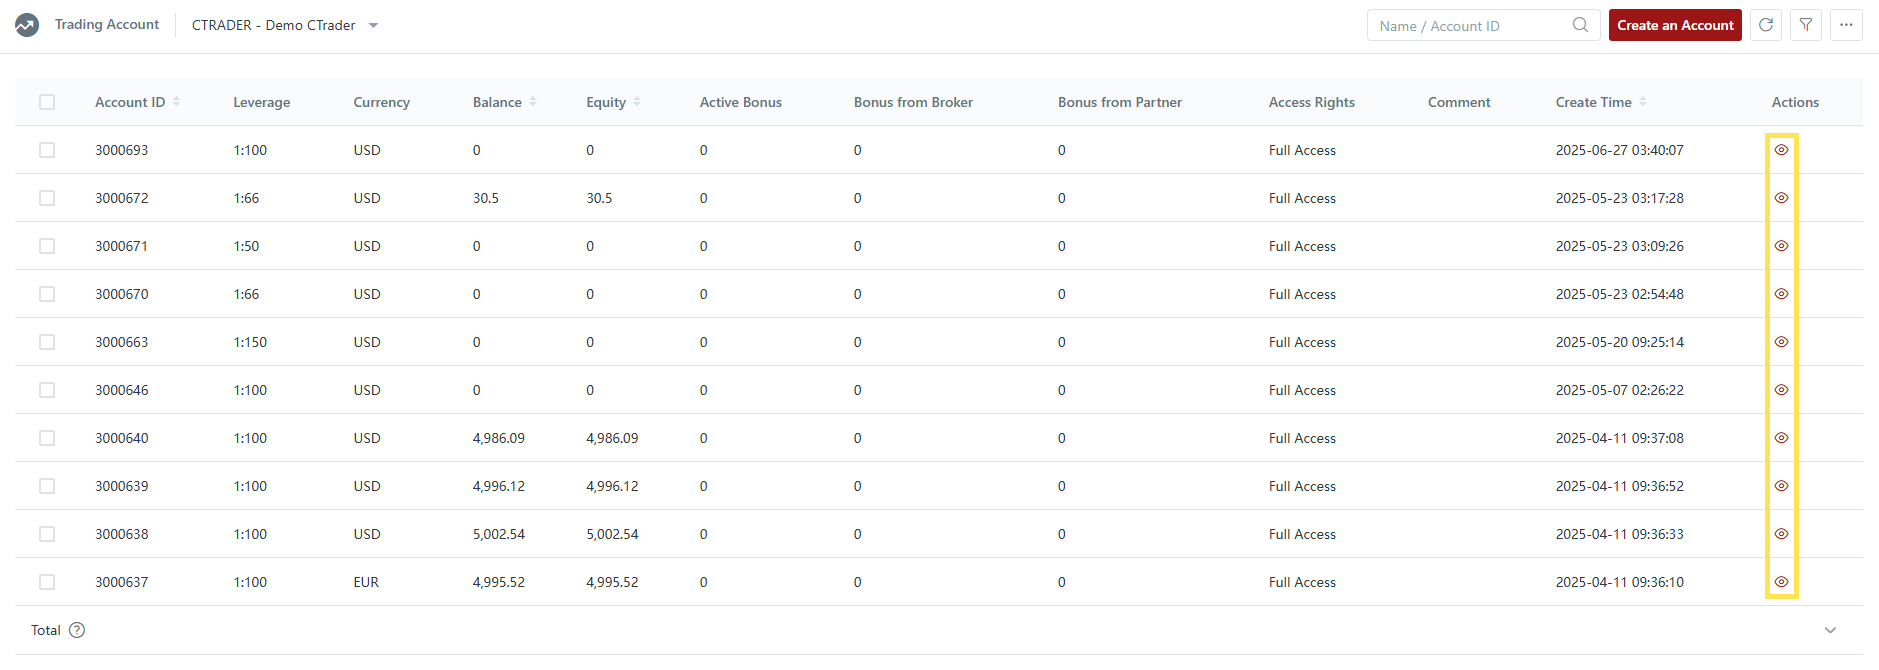
1. Locate the Trading Account you want to delete and click the "View" icon.
2. Click the "Delete" button. \
\

3. A popup confirmation will appear. Click "Confirm" to proceed. \
\

4. The account will be deleted.
{% endstep %}
{% step %}
#### Bulk Deletion of Trading Accounts
1. Select the Trading Accounts you want to delete.
2. Click "Delete".
3. The list of selected trading accounts is displayed below. Select or deselect accounts as needed, then click "Delete Permanently" to confirm your action.
4. A pop-up will appear confirming that the batch process has started. Click "Confirm" to be redirected to the Batch Operations page.\
\

5. There, you can view the overall status of the batch process. Click "View" to check the status of each individual record.
6. For any failed records, the reason for failure will be clearly stated.
{% endstep %}
{% endstepper %}
### 6) Email Notification Enhancements
#### **A) Referral Info in Approval Emails**
Admin notifications for approved requests now include referral details, making it easier to identify the referring IB and follow up when key client actions occur.
To configure this, follow these steps:
{% stepper %}
{% step %}
#### Navigate to Notification Templates
1. Go to "Settings" > "Notification Settings" > "Notification Templates".
2. Under "Email Templates", select "To Admin".
3. Locate the task approval email and click the "Edit" icon.
{% endstep %}
{% step %}
#### Configure Email Template
1. You can customize the email template to include the client's Referral Name and Referral ID.
2. Click on the parameter tags below to copy them into the template.
3. Click "Save".
4. The email will now automatically include the selected referral details.
{% endstep %}
{% endstepper %}
#### **B)** Dedicated cTrader Welcome Emails
New cTrader accounts now trigger platform-specific emails, ensuring clients receive tailored onboarding details—instead of the generic template used for all trading platforms.
This applies to both **live** and **demo** cTrader accounts.
To amend the notification templates, follow these steps:
{% stepper %}
{% step %}
#### Navigate to Notification Templates
1. Go to "Settings" > "Notification Settings" > "Notification Templates".
2. Select "Email Templates" or "Popup Templates".
3. Select "To Client".
4. Locate the notifications you want to amend and click the "Edit" icon.
{% endstep %}
{% step %}
#### Edit Notification Template
1. Make the necessary amendments to the template.
2. Click "Save".
{% endstep %}
{% endstepper %}
### 7) Report Enhancements
#### **A)** Client Activity Insights in Transactions Report
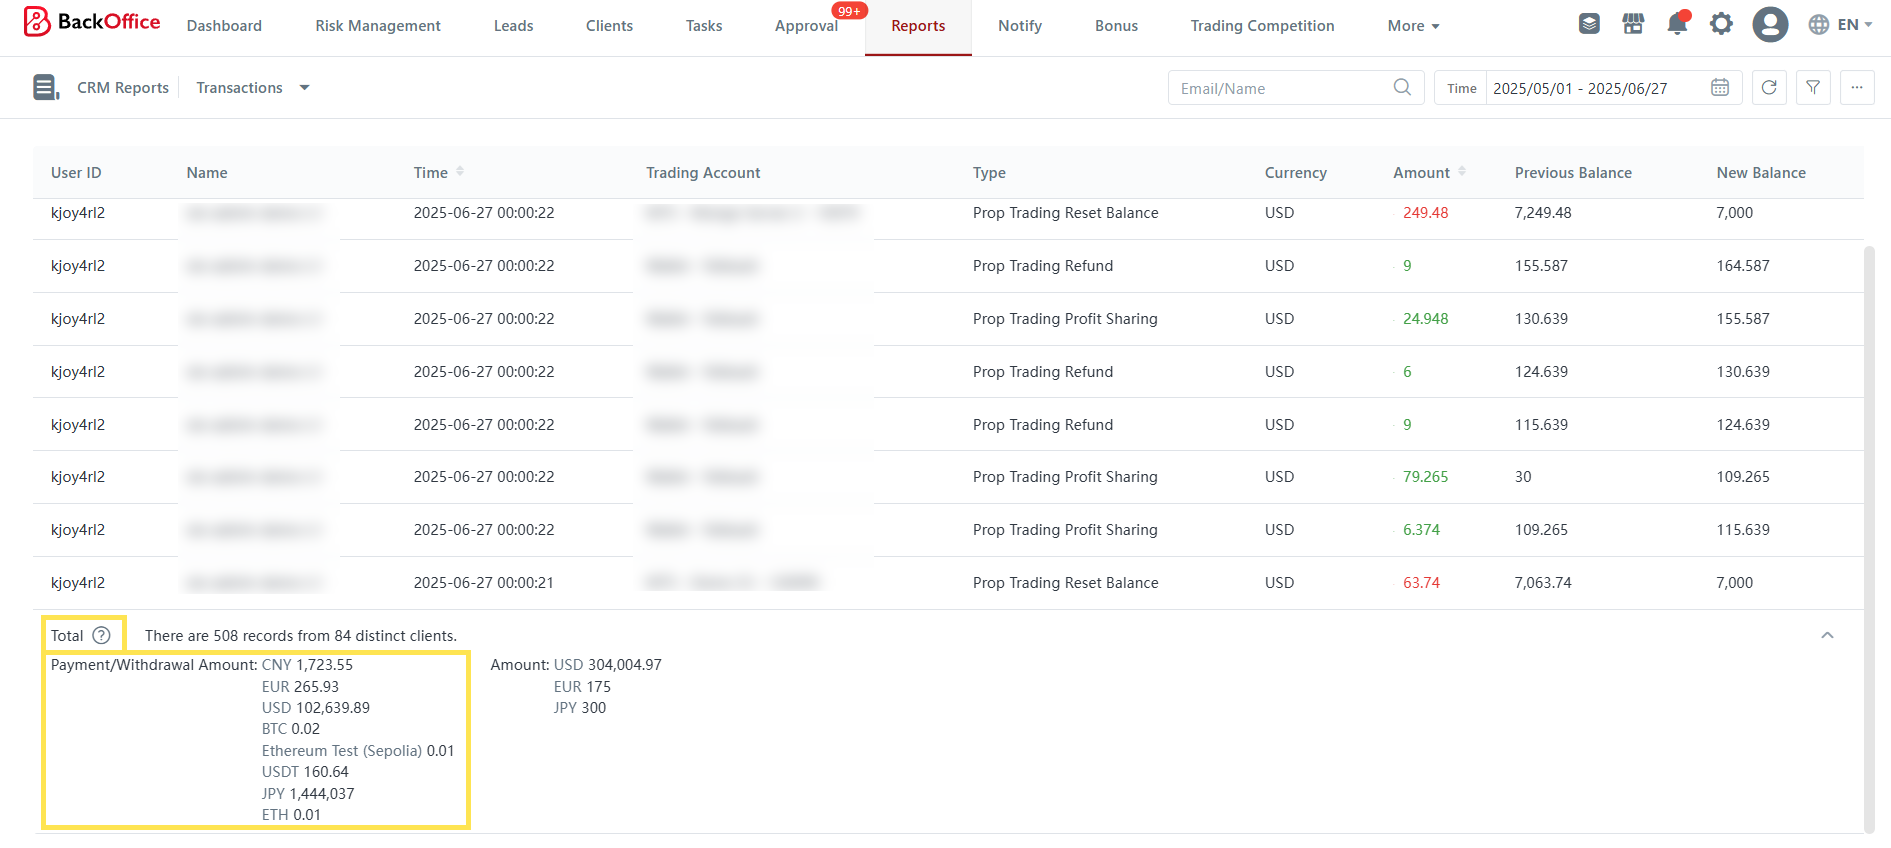
Previously, you could only see the total number of records—without knowing how many unique clients they came from. Now, the report also shows the number of distinct clients, helping you quickly understand whether the transactions are spread across many clients or concentrated among a few.
Furthermore, you can now view the total Payment/Withdrawal Amount by clicking "Total".
Previously, totals reflected only the amounts converted into clients’ trading account currencies. Now, you can see the original transaction amounts and currencies, giving you clearer insight into client funding preferences—such as USDT, ETH, and others.
This helps with product planning and payment channel optimization.
#### **B)** Advanced Referral Filters in Client Portal
Advanced referral filtering—previously only available in the back office—is now accessible in the client portal. Referrers can easily filter by downlines, uplines, custom level range from 0 to 100, or use the referral tree for precise, targeted views.
You can now:
1. Enter one or more names and select "All Downlines" to view data for all downlines under those individuals.\
\

2. Enter one or more names and select "All Uplines" to view data for all uplines of those individuals.\
\

3. Enter one or more names and select "Custom Downlines", specifying the number of downline levels to include.
1. You can set the range of downline levels to search for.
2. By default, the range is set from 1 to 1, which includes only the direct downlines of the selected referrer(s).\
\

3. You can change the range start to 0 if you want to include the selected referrer(s) themselves.\
\

4. Adjust the number of levels to search deeper—for example, setting it to 3 will include downlines up to the third level. The maximum downline level is 100. \
\

4. For highly customized selections, use the **Referral Tree** to manually select the specific downlines you want to view.
1. Click the "Referral Tree" icon.\
\

2. Click the ">" icon to expand branches of the tree.
3. Select the desired clients and click "Confirm".\
\

This feature is added to the following reports:
1. My Clients - Referral Details
2. My Clients - Trading Account
3. All Clients' Reports