> For the complete documentation index, see [llms.txt](https://reference-guide.gitbook.io/crm-version-release-notes/llms.txt). Markdown versions of documentation pages are available by appending `.md` to page URLs; this page is available as [Markdown](https://reference-guide.gitbook.io/crm-version-release-notes/v5.6.0-customizable-user-interface-launch-of-new-email-design-templates-and-other-optimizations.md).
# V5.6.0 - Customizable User Interface, Launch of New Email Design Templates & Other Optimizations
Learn about all the details of all our recent CRM updates here.
#### Released Date - 17 Oct 2022
In this new release, you can now enhance your corporate branding by customizing your CRM portal to your own style preferences and upgrade the look of your emails by applying our pre-built email design templates. Other optimizations have been done to improve data analytics and streamline your operations. Read on to find out more!
## Customizable User Interface for Client & Backoffice Portal
### 1) Landing Page Style
1. You can now customize the landing page style for both the CRM Client & Backoffice Portal.
2. The available landing page styles are:
{% tabs %}
{% tab title="Center " %}
This is the default selection.
1. Client Portal
2. Backoffice Portal
{% endtab %}
{% tab title="Left " %}
1. Client Portal
2. Backoffice Portal
{% endtab %}
{% tab title="Right " %}
1. Client Portal
2. Backoffice Portal
{% endtab %}
{% endtabs %}
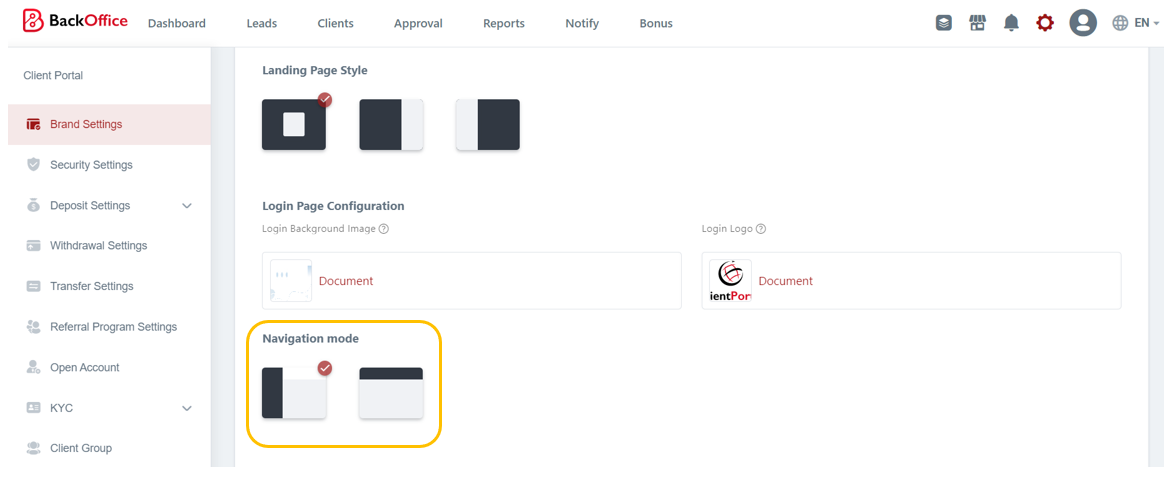
### 2) Navigation Mode
You can customize the navigation mode for both your CRM Client & Backoffice Portal.
{% tabs %}
{% tab title="Left" %}
The default navigation mode for Client Portal is Left.
1. Client Portal
2. Backoffice Portal
{% endtab %}
{% tab title="Top " %}
The default navigation mode for Backoffice Portal is Top.
1. Client Portal
2. Backoffice Portal
{% endtab %}
{% tab title="Mobile UI " %}
The navigation mode for Mobile will always be Left, regardless of the settings.
1. Client Portal \

2. Backoffice Portal \

{% endtab %}
{% endtabs %}
## Pre-Built Email Design Templates
### 1) Marketplace Installation
You can now install pre-built email design templates on marketplace.
### 2) Application of Email Design Templates
Once you have installed the email design templates, you can apply them to emails sent out via CRM in the following modules:
{% tabs %}
{% tab title="Notify > Emails " %}
1. Select your preferred email template.
2. You will be notified that upon applying an email design template, the existing email content will be cleared and replaced. \

3. Upon confirmation, the email template will reflect accordingly. You can then amend the email content before sending it out to your clients.
{% endtab %}
{% tab title="Email Settings > Email Templates " %}
1. Select the email that you wish to amend and choose your preferred template.
2. You will be notified that upon applying an email design template, the existing email content will be cleared and replaced. \

3. Upon confirmation, the email template will reflect accordingly. You can then amend the email content and save.
{% endtab %}
{% endtabs %}
### 3) Removal of Email Design Templates
1. You can remove the existing template applied to your email, by selecting the “Remove Template” button.
2. You will be notified that removing the template will clear the email content completely.\

## Trading Account Settings
### 1) Added Field to Trading Accounts Page: Enable One Time Password
1. There is now an additional setting for you to enable One Time Password (OTP) for your trading accounts.
2. By default, the OTP will be disabled. By enabling it, it means that your clients will be able to setup OTP for their trading accounts for an additional level of security.
### 2) Added Fields for Approval Requests: Send Report & Enable OTP
1. In this new release, we have added “Send Report” and “Enable OTP” settings into trading account approval requests. By default, these options will be unchecked.
2. You will be able to edit the settings in the approval details page.
### 3) Batch Operations
You can now batch update One Time Password & Send Report settings for your client’s trading accounts.
{% tabs %}
{% tab title="Step 1" %}
1. Select the trading accounts and the batch operation required.
{% endtab %}
{% tab title="Step 2" %}
1. Select the respective settings you wish to apply to the trading accounts.\
\

{% endtab %}
{% tab title="Step 3" %}
1. Upon clicking “Confirm”, you will be notified that the batch operation is being processed and you can view the status of the batch operation.
{% endtab %}
{% endtabs %}
## Enhancements to Clients Module
### 1) Added Column for Lead Source on Clients Module
1. You can now view the Lead Source of your clients by adding it as a visible column.
2. Lead Source refers to the source of the Leads input under the Leads module.
3. When a lead is converted into a client, the source of the Lead will be displayed under the “Lead Source” column of the Clients Module.
4. You can also filter your clients based on Lead Source.
### 2) Clients Module - Trading Account Filter
You can now easily filter clients with no trading accounts by using the “Trading Account is empty” filter.
## Improvements to Display of Data
### 1) Comma Separators to Numerical Values
1. Numerical values on CRM are now comma (,) separated by thousands, allowing you to process and analyse data more efficiently.
2. Kindly note that the comma separator is only a front-end display on your CRM. It will not reflect for downloaded reports.
### 2) Added Space After Colon (:)
There is a space added after each colon (:) to allow for easier data analysis.