# V5.9.0 - New Ticketing Function & Customization of Exchange Rate Settings
#### Released Date - 7 Nov 2022
In this release, a new ticketing system has been added to your CRM to facilitate your customer service operations and improve customer relationship. Your clients will be able to submit enquiries via tickets, and you can easily track and manage them on your CRM. This function allows you to assign your tickets, track ticket statuses and resolve your client’s issues more efficiently. Furthermore, you can now customize multiple exchange rates for the same currency for different client groups now. Read on to find out more!
## Ticketing System
### 1) Marketplace Installation
1. You can now install the Ticketing System via the CRM marketplace.
2. Upon installation, you will see a new “Tickets” tab on your CRM Backoffice portal.
### 2) Client Portal
Permissions
1. For your clients to submit tickets, you will need to ensure you provide the permissions to the respective client groups.
2. Providing the “Read and Submit Ticket” permission means that your clients will be able to access the ticketing module, submit tickets and view ticket statuses.
Ticket Submission
1. Click onto the Ticket Icon and Select “Submit Ticket”.
2. Fill in the Ticket Subject & Description and Click Submit. A client can only submit a maximum of 10 tickets per day.
3. Client will be able to attach documents or screenshots into the ticket by clicking the “Attach” icon:
* For each ticket, the maximum number of attachments allowed is 10.
* The maximum size for each attachment is 10MB.
* The maximum number of characters for each file name is 500.
4. Upon ticket submission, your client will be redirected to the Ticket History page. The ticket status will show “Pending”.
Ticket Status
1. Your clients will be able to keep track of all their tickets in the Ticket History tab.
2. The different ticket statuses are:
* Pending - tickets that are submitted and pending reply from broker
* Processing - broker is reviewing the ticket / issue raised
* Resolved - issue has been resolved
* Closed - issue has been resolved and ticket has been closed
* Reopen - issue was previously closed but client re-opened the ticket by replying to the ticket
3. From Ticket History, the client will also be able to see the latest reply from brokers.
* If there is a reply from the broker, the Latest Reply will show the first few words of the reply.
* If there is no reply from the broker yet, the Latest Reply will be empty.
* If the reply from broker is unread, there will be a red circle indicator.
Replying to Tickets
1. Client is able to view broker’s replies by clicking onto the respective ticket.
2. The client will not be able to see the name of the person replying to their ticket. By default, the CRM will show “Customer Service”.
3. Client can also reply to the ticket by clicking “Reply”, typing out their reply and clicking the “Send” button. Similarly, client is able to attach files to their reply.
### 3) Backoffice Portal
Permissions
To begin using the ticketing function, you will need to ensure the correct permissions are given to the respective teams:
1. Read Tickets - you can only view tickets submitted by clients.
2. Deal Tickets - you can reply, change status and assign tickets accordingly.
Ticket Management
1. Click onto the “Tickets” tab to view and manage your client’s tickets. There are 2 sub-tabs available:
* Ticket - for you to view and manage your client’s tickets
* Report - provides a comprehensive overview on your ticket management system
2. Under the sub-tab Tickets, you will be able to see all tickets raised by your clients. The tickets are divided into different categories
* My Tickets - all tickets that are assigned to you
1. My Open Ticket - open tickets assigned to you
2. My Resolved Ticket - resolved tickets assigned to you
3. All Tickets - all tickets assigned to you
* All Tickets - all tickets submitted by your clients
1. Not Assigned - all tickets unassigned
2. Not Resolved - all tickets not resolved
3. Resolved - all tickets resolved
4. Closed - all tickets closed

3. In the Tickets list, you will be able to see:
* Ticket ID
* Client Name
* Subject
1. Shows Ticket Subject
2. Reply Status of Ticket
* Created Time
* Last Update Time
* Handler
* Ticket Status
4. You can also search for tickets either via Client Name, Ticket ID or Subject of Ticket.
5. You can filter the tickets according to the ticket creation date, reply status, handler or ticket status.
6. You can view clients’ tickets by clicking onto it.
7. To assign the ticket, you can select “Handler” and assign it to the respective personnel.
* If you do not assign a Handler, and proceed to reply to the client, the ticket will automatically be assigned to you.
8. You can change the ticket status here.
9. To reply to your client, click onto “Reply”, type in your response and click “Send”.
10. You will be able to delete your own replies to clients but will not be able to delete your client’s replies.
11. You can also view the logs for each ticket here.
Reports
From the reports tab, you can filter the date range accordingly to view the respective data:
1. Ticket Statuses
2. Average Reply Time\
The average reply time refers to the average time taken for you to first respond to a client’s ticket.
3. Tickets Created By Time\
You will be able to see the total tickets created and tickets resolved on a daily basis.
## Customization of Exchange Rates
### 1) Setting up of Exchange Rates
1. This function applies to Deposit Settings, Withdrawal Settings and Transfer Settings.
2. You can now setup multiple exchange rates for a single currency pair.
{% tabs %}
{% tab title="Step 1" %}
To setup the exchange rates, select the “Edit” button for the particular currency pair.
{% endtab %}
{% tab title="Step 2" %}
You will be able to customize the exchange rate for respective client groups.
1. You can select multiple client groups; or
2. Select “Other Client Groups” - this refers to all client groups apart from the client groups that already has an exchange rate configured for that particular currency pair.
{% endtab %}
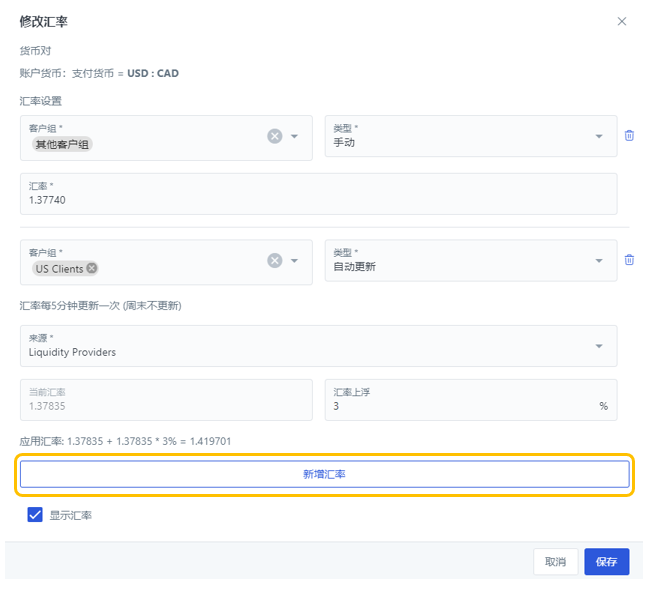
{% tab title="Step 3" %}
1. Set the exchange rate type and the respective markup / exchange rate.
2. You can add exchange rate by clicking the “Add Exchange Rate” button and filling in the relevant information. This means that for the same currency pair (e.g. USDCAD), different exchange rates will be applicable for different client groups.
3. Once you have setup the exchange rates for the different Client Groups, click “Save”.
4. You will be able to see the Client Groups and the respective exchange rate settings.
5. 设置汇率类型和相应的加价/汇率。
6. 你可以通过点击“新增汇率”按钮并填写相关信息来添加汇率。这意味着对于同一货币对(比如USDCAD),不同汇率适用于不同客户组。
7. 已为不同客户组设置了汇率后,点击“保存”。
8. 你可以看到客户组和相应的汇率设置。
{% endtab %}
{% endtabs %}
### 2) Client Portal - Submission of Deposit / Withdrawal / Transfer Requests
1. Once the exchange rate has been setup, clients’ will be able to see the exchange rate when they submit a deposit / withdrawal / transfer request.
2. If the exchange rate is not configured, client will face an error while submitting a deposit / withdrawal / transfer request. The error will inform clients that the exchange rate is not configured yet and that they will need to contact you.
### 3) Manual Creation of Deposit / Withdrawal Requests
1. Similarly, when you are manually creating deposit / withdrawal requests on the CRM Backoffice, you will be able to see the exchange rate setup for the respective client group.\

2. If the exchange rate is not configured, you will face an error while creating the deposit / withdrawal request. The error will inform you that the exchange rate is not configured yet.\