# V7.8.0 - Stripe Integration
**Released Date - 8 March 2024**
Good news to all Prop Firms! Version 7.8.0 features a full integration with [Stripe](https://stripe.com/) - a new payment channel addition exclusively for prop trading. Simply enable the feature within your CRM marketplace, register for a Stripe account and you are all set to onboard Prop Challenge participants all from every corner of the globe. Read on for more details on this exciting release.
{% hint style="warning" %}
Stripe is exclusively available to Proprietary Trading Firms and is not accessible to FX brokers.
{% endhint %}
## Summary
1. **Trusted Payment Provider:** Trusted by millions of businesses, from startups to Fortune 500 companies, Stripe is a globally recognized payment solution. By integrating Stripe, you can confidently provide your clients with a trusted and credible payment channel, ensuring the security of funds and peace of mind for all parties involved.
2. **Extensive Payment Options:** Enable your trader's unprecedented convenience with Stripe's extensive array of over 100 payment methods, catering to diverse client preferences. Operating in over 40 countries and supporting hundreds of currencies, Stripe ensures accessibility and seamless transactions worldwide.
3. **Enhanced Payment Management:** Experience real-time updates on payment statuses, empowering you to efficiently review and manage payments, ensuring prop challenge participants are able to purchase related services timely.
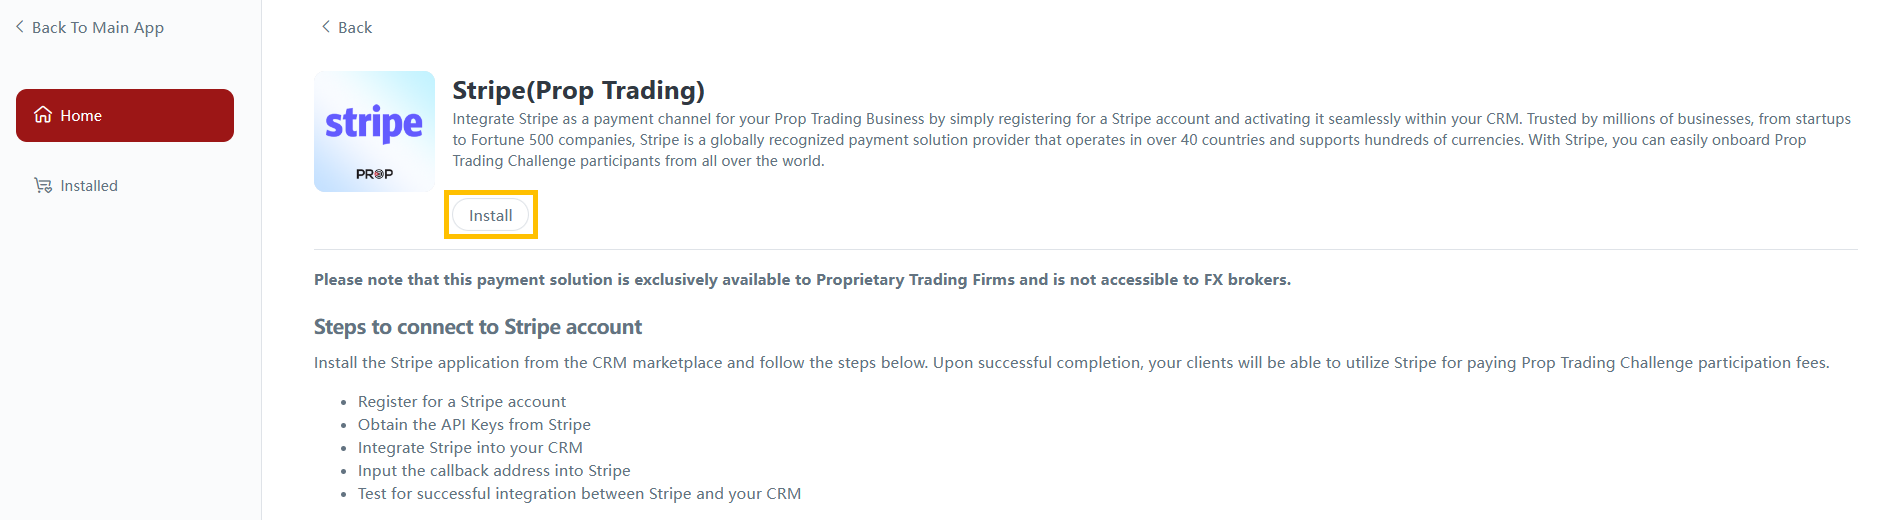
### 1) Marketplace Installation & Permission Settings
To begin offering Stripe, follow these steps to install it via the CRM marketplace:
1. Navigate to the CRM marketplace.
2. Search for "Stripe" and click on "Install."
3. You will be redirected to the details page where you can learn about the functionalities. Click "Install" to proceed with the installation.
Once Stripe is installed on your CRM, ensure to enable the following permissions:
1. Read Stripe Settings: Allows viewing of settings for Stripe.
2. Create Stripe Settings: Enables creation and configuration of settings for Stripe.
3. Update Stripe Settings: Facilitates updating and amending the configuration for Stripe.
4. Delete Stripe Settings: Grants the ability to delete Stripe settings as needed.
### 2) Register for a Stripe Account
Next, to register for a Stripe account, follow these steps:
{% tabs %}
{% tab title="Step 1" %}
1. Navigate to [Stripe's official website](https://www.stripe.com).
2. Click "Start Now".
{% endtab %}
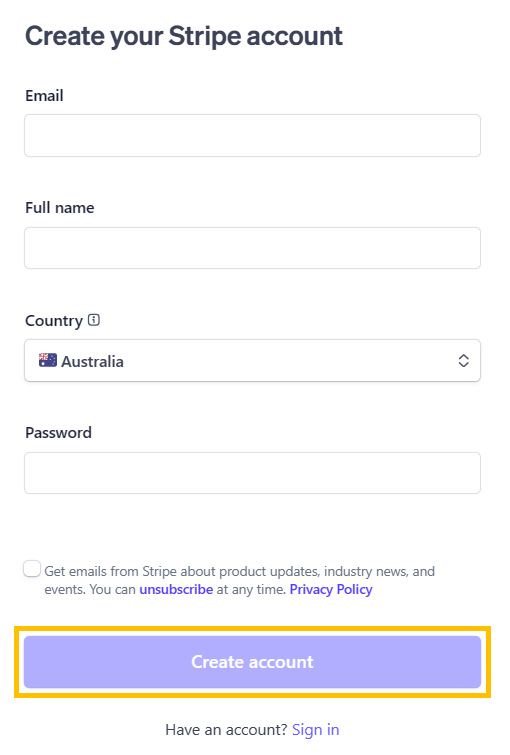
{% tab title="Step 2" %}
1. Fill in the required details and proceed by clicking "Create Account".
2. You'll need to verify your email address by clicking on the verification link sent to your email inbox.
{% endtab %}
{% tab title="Step 3" %}
1. Upon verifying your email address, you will be redirected to activate payments on your account. To proceed, click "Activate Payments".
2. Complete the onboarding form to complete your Stripe account creation.
{% endtab %}
{% endtabs %}
### 3) Retrieving Required Parameters from Stripe
Once you have created your Stripe account, follow these steps to retrieve the required parameters:
{% tabs %}
{% tab title="Step 1" %}
1. Navigate to the [Stripe dashboard portal](https://dashboard.stripe.com/).
2. Fill in your credentials and click "Continue" to log in.
{% endtab %}
{% tab title="Step 2" %}
1. Once logged in, click on "Developers".
2. Select "API keys".
3. Retrieve the Publishable Key and the Secret Key. For the Secret Key, click "Reveal test key" to access it.
{% endtab %}
{% endtabs %}
### 4) Connect Stripe to CRM
To connect your Stripe account to the CRM, follow these steps:
{% tabs %}
{% tab title="Step 1" %}
1. Navigate to Settings > Stripe Settings.
2. Click "Create".
{% endtab %}
{% tab title="Step 2" %}
1. Fill in the Name, API Public Key and API Secret Key.
2. Select the currencies accepted and the preferred payment page display.
3. Click "Save".
{% endtab %}
{% endtabs %}
### 5) Inputting Callback Address into Stripe
You will need to input the CRM callback address into your Stripe account. To do so, follow these steps:
{% tabs %}
{% tab title="Step 1" %}
1. Once you have created the Stripe settings, you can retrieve the callback address by clicking the "View" icon.
2. You will be able to see the callback address here.
{% endtab %}
{% tab title="Step 2" %}
1. Navigate to the [Stripe dashboard portal](https://dashboard.stripe.com/).
2. Fill in your credentials and click "Continue" to log in.
{% endtab %}
{% tab title="Step 3" %}
1. Once logged in, click on "Developers".
2. Select "Webhooks".
3. Click "Add an endpoint". \

4. Fill in the CRM callback URL into "Endpoint URL". \

{% endtab %}
{% tab title="Step 4" %}
1. Click "Select events". \

2. Select all options under "Checkout" and click "Add events".\

3. Click "Add endpoint". \

{% endtab %}
{% endtabs %}
### 6) View, Edit & Delete Stripe Settings
You will be able to perform the following actions on your Stripe Settings:
View Settings
To view Stripe settings, follow these steps:
1. Locate the specific Stripe setting you wish to view.
2. Click on the "View" icon.
3. You will be able to see all the configured settings.
Edit Settings
To edit Stripe settings, follow these steps:
1. Locate the Stripe settings you want to edit.
2. Click on the "Edit" icon.
3. Make the necessary amendments.
4. Click on "Save" to save the updated settings.
Delete Settings
To delete Stripe settings, follow these steps:
1. Locate the Stripe settings you want to delete.
2. Click on the "Delete" icon.
3. A confirmation popup notice will appear.
4. Click "Confirm" to proceed with the deletion. \

5. Please note that if the Stripe setting is being used by an existing deposit method, you will not be able to delete it.
### 7) Setting Up Stripe as a Payment Method
To setup Stripe as a deposit method for your clients, follow these steps:
{% tabs %}
{% tab title="Step 1" %}
1. Navigate to the Deposit Settings section within your CRM.
2. Click on the "Create" button to create a new deposit method.
{% endtab %}
{% tab title="Step 2" %}
1. Select the Stripe setting you have configured under "Stripe Settings" as the platform for the deposit method.
2. A notice will appear to remind you that Stripe is exclusively for the purchase of Prop Trading Packages only.
3. Upon clicking "Stripe" as the platform, the icon will automatically select the "Stripe" icon.
{% endtab %}
{% tab title="Step 3" %}
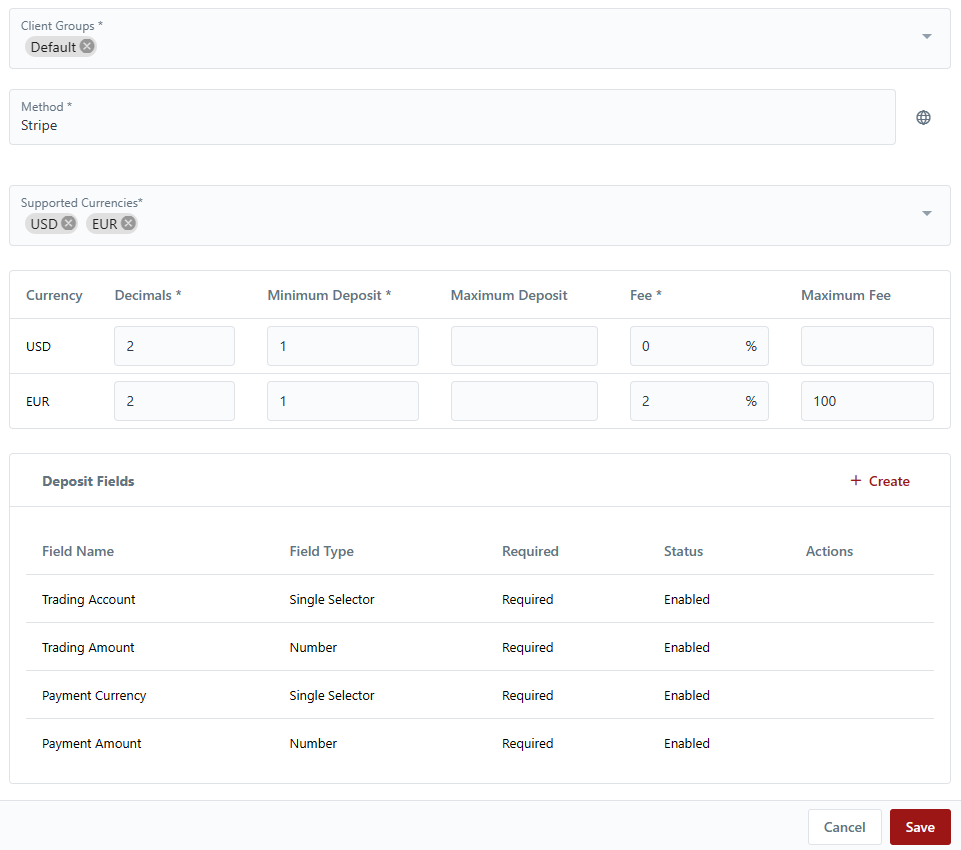
Fill in the respective fields as follows:
1. Select the client groups for which this deposit method will be allowed.
2. Provide a name for the deposit method.
3. Select the supported currencies that your clients can use for deposits.
4. Fill in the details for each currency, including:
* Decimals: Specify the number of decimal places for the currency.
* Minimum Deposit: Set the minimum deposit amount for the currency.
* Maximum Deposit: Set the maximum deposit amount for the currency.
* Fee: Enter the fee amount associated with the deposit.
* Maximum Fee: Specify the maximum fee applicable for the deposit.
5. Configure the required deposit fields as per your preferences.
6. Click on the Save button to save the deposit method configuration.
{% endtab %}
{% tab title="Step 4" %}
Once Stripe is setup, ensure you select it as an accepted payment method for direct purchase of prop packages.
{% endtab %}
{% endtabs %}
### 8) Purchase Prop Trading Package via Stripe
To purchase prop trading package via Stripe, your clients can follow these steps:
{% tabs %}
{% tab title="Step 1" %}
1. Navigate to Prop Trading and select the challenge to participate in.
2. Select the package and click "Participate Now!".
{% endtab %}
{% tab title="Step 2" %}
1. Select "Stripe" as the payment method.
2. Click "Complete Payment".
3. A popup notice will appear for you to verify the amount. Click "Pay Now" to proceed. \

{% endtab %}
{% tab title="Step 3" %}
Your client will be able to complete their payment via Stripe.
{% endtab %}
{% tab title="Step 4" %}
1. A payment request will be sent to you, and it will be either manually or automatically approved based on the approval settings configured by you.
2. Once the payment is made, the client will be redirected to the prop trading request history page.
{% endtab %}
{% endtabs %}
### 9) Review Prop Trading Participation Requests
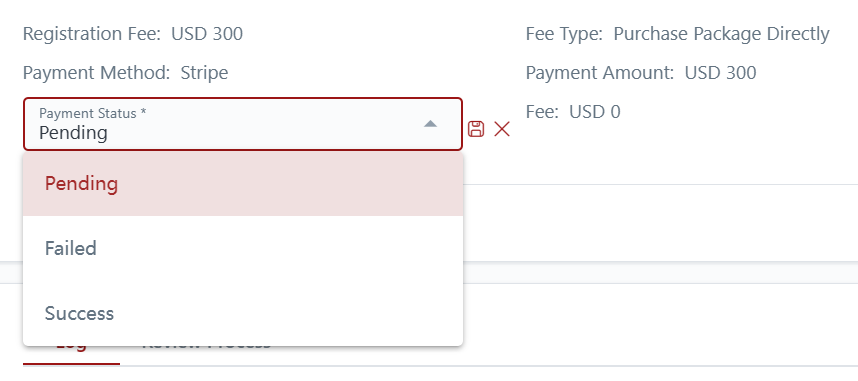
1. Once your client has completed the payment via Stripe, you will be able to view their request under Approvals > Prop Trading Participation.
2. You will be able to view the payment method and their respective payment status:
* Success: This indicates that the callback for the deposit was successful, confirming a completed transaction.
* Failed: This status signifies that the callback for the deposit failed, indicating an unsuccessful transaction.
* Pending: If the callback for the deposit has not been received yet, the status will be shown as Pending, indicating that the transaction is still being processed.
3. To update and refresh the payment status, you can click on the refresh icon provided. This action will initiate a refresh of the status, ensuring that the most up-to-date information is displayed.
4. Furthermore, you have the flexibility to manually adjust the payment status by clicking the "Edit" icon.
5. You can amend the payment status to manage exceptional cases and proceed to approve or reject the request accordingly.